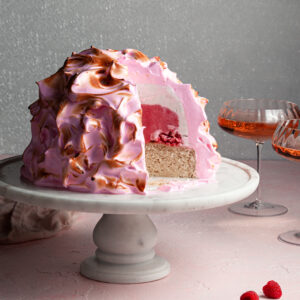
Vegan Baked Alaska
This baked Alaska is a delicious showstopper vegan dessert yet simple to make! A dome of dairy-free vanilla ice cream, raspberry sorbet sits on top of a vegan vanilla sponge cake, covered in a cloud of egg-free meringue! It's a fantastic dairy-free and egg-free classic dessert for the holidays even if your group is small - simply pop the leftovers back in the freezer for tucking into later.
Print
Pin
Save Recipe
Servings: 10
Calories: 561kcal
Ingredients
For the Ice Cream Dome:
- 4 cups vegan vanilla ice cream
- 2 cups vegan raspberry sorbet
- ½ cup raspberries
For the Vegan Vanilla Sponge Cake:
- 1 ½ cups all-purpose flour
- 1 cup granulated sugar
- 2 tbsp cornstarch
- 1 ½ tsp baking powder
- ½ tsp baking soda
- ½ tsp salt
- 1 cup plant-based milk (I use soy milk)
- ⅓ cup neutral oil (eg. grapeseed, canola, sunflower etc)
- 2 tbsp distilled white vinegar
- 1 tbsp vanilla extract (clear if possible)
For the Vegan Italian Meringue:
- 1 cup reduced aquafaba*, chilled
- 1 tsp Cream of Tarter
- 2 cups granulated sugar
- ⅔ cup water
- 1 tbsp vanilla extract (clear if possible)
- few drops of pink vegan gel food dye. optional (not oil based)
Instructions
For the Ice Cream Dome:
- Remove the vanilla ice cream from the freezer and soften for 10 minutes. While it softens, line a 2-3 quart bowl with plastic wrap leaving a bit of overhang to remove the ice cream later.
- Scoop the softened ice cream into the prepared bowl. Quickly spread ice cream over the bottom and up the sides of the bowl, leaving the center hollow; cover and freeze for 30 minutes.
- Remove the raspberry sorbet from the freezer and soften for 10 minutes. Scoop into a bowl and gently stir in the fresh raspberries. Remove the bowl with the vanilla ice cream from the freezer and fill the cavity with the raspberry sorbet. Cover with plastic wrap and freeze overnight, or up to a month. The front of the freezer is the warmest, so best to keep the ice cream in the back if possible.
For the Vegan Vanilla Sponge Cake:
- Preheat the oven to 350°F/177°F/gas 4 . Prepare an 8-inch (20 cm) round cake pan with non-stick baking spray and parchment paper cut into circles on the bottom.
- Sift the flour, sugar, cornstarch, baking powder, baking soda and salt together in a large mixing bowl. Whisk well to evenly combine.
- Combine the plant-based milk, oil, vinegar and vanilla extract in a medium sized bowl or large measuring glass. Whisk well to emulsify the oil and milk together.
- Once the oven has completely preheated, add the wet ingredients to the dry ingredients. Mix until combined. Pour the batter into the prepared cake pan and bake for 35-38 minutes. Don't open the oven early or your cake may collapse in the middle. The cake is done once it pulls from the sides, and a toothpick inserted into the middle comes out clean or with a few cooked crumbs.
- Cool the cake for 10 minutes on a rack. Gently run a sharp knife along the sides of the cakes to loosen any bits that are stuck. Gently and evenly turn the pan over on a wire cooling rack. Remove the pan. Once completely cooled, gently wrap in plastic and place in the freezer.
For the Vegan Italian Meringue:
- Prepare your stand-mixer bowl and balloon whisk (or large bowl and hand mixer beaters) by wiping them down with white vinegar to remove any fat residue. The smallest amount of fat or oil will prevent the meringue from whipping fully.
- Pour the chilled, reduced aquafaba and Cream of Tarter into the bowl, and whisk on high for about 5-10 minutes, or until stiff peaks form. The meringue has reached stiff peaks if it holds its shape when the whisk is turned upside down and the meringue peak remains upright.
- Wipe down a clean small pot, whisk and candy thermometer with vinegar. Place the sugar and water the pot over medium-high heat, gently whisking only to combine the sugar evenly with the water. Do not stir afterwards. Bring to a boil, then reduce the heat to a simmer taking care not to boil it over. Using a candy thermometer, bring the mixture to soft-ball stage or 240°F(116°C). This may take 10-15 minutes.
- Once soft-ball stage is reached, add in the vanilla extract taking care not to get burned as the mixture will sputter. Add in any food dye you wish to use. With the stand-mixer running, carefully and very slowly pour the hot syrup into the whipped aquafaba. If you add it too fast the meringue will deflate and you may get flicked with hot syrup. Keep whipping on high until the temperature comes down to just above room temperature. Chill for 10-15 minutes or until cold. The meringue will keep for a couple of days in the fridge at this point. If not using it straight away, whip it again before applying it to the ice cream dome.
To Assemble:
- Remove the bowl of ice cream from the freezer. Peel off the plastic and place cake layer on the top. Cover with plastic wrap and place back in the freezer. To freeze at 30 minutes.
- Remove the ice cream and cake from the freezer. Remove from the bowl and place on a serving plate or cake disc if serving on a cake stand that won't fit in the freezer.
- Spread the meringue over the ice cream and cake ensuring there are no gaps. Create peaks and crevices with the back of a spoon or offset spatula. If you prefer to pipe the meringue on for more texture, spread a layer of meringue on the dome first to seal it in then return it to the freezer every minutes depending on how long it takes you to pipe. Toast the meringue with a kitchen torch, and serve immediately, or place in the freezer (unwrapped for up to a few days before it absorbs odors) until serving.
- To serve, use a large, sharp chef knife. Have a tall glass or cup filled with very hot water. Dip the knife in the water to heat, wipe off the water with a clean dish towel, and slice. Dip the knife back into the water as necessary - this helps create clean cuts.
Nutrition Info:
Calories: 561kcal | Carbohydrates: 102g | Protein: 5g | Fat: 15g | Saturated Fat: 4g | Cholesterol: 23mg | Sodium: 272mg | Potassium: 247mg | Fiber: 2g | Sugar: 80g | Vitamin A: 315IU | Vitamin C: 4mg | Calcium: 143mg | Iron: 1mg
Notes:
*Strain the water chickpeas were cooked in (either canned or homemade, but if canned, make sure there’s no additives). Simmer until half the volume then chill before using. You'll be starting with 2 cups (500 mL) of aquafaba to get the 1 cup (250 mL) you need.
Make-Ahead/Storage:
The ice cream dome and cake will keep well tightly wrapped in the freezer for a month or so. The meringue can also be applied to thr ice cream dome and then frozen. It'll last a couple of days in the freezer (depending on what you have in there) until it starts absorbing freezer odor. It won't be possible to wrap the meringue without damaging it. You can torch the meringue before putting it in the freezer, but it's pretty fun to do at serving time.
If you don't have a kitchen torch or blow torch, you can enjoy the meringue as it is, or you can preheat the oven to 500°F/260°C/gas mark 10. Bake the Alaska for 2-4 minutes until lightly toasted.
Did you make this recipe?Tag @crumbs.and.caramel on Instagram!